How To Make No-dig Beds

Introduction
No dig beds are simple to make, requiring a one off task of preparing the ground and assembling the frame. After this, as the name implies, they are a joy to use as all the hard work digging over a patch of ground each year is removed. If you want to nourish the ground, you know exactly where to put compost or well rotted manure. After a quick clear up in late autumn or early spring, you have a space immediately ready for young seedlings.
In the video below there is a step by step guide for making no-dig beds, including tips for further reducing work by including low maintenance paths, and a method for reducing weeding.
Below the video there is an example shopping list and video transcript.
Step By Step Video
YouTube Video
Materials Used For My No-Dig Beds
For each no-dig bed (3 m by 1.2 m):
- 2 x 3m Length Timber (220 mm depth, 45 mm width)
- 2 x 1.2m Length Timber (220 mm depth, 45 mm width)
- 4 x brackets (105 mm height, 90 mm width, 105 mm length)
- 40 x wood screws (No. 8, 4 mm x 40 mm)
Approximate cost per no-dig bed £96* as follows:
- £82 for wood
- £12 for brackets
- £2 for screws
*2019 prices from DIY stores. Re-using old scaffolding boards can be a good option to reduce the price of the wood.
Other items shown in the video:
- Large landscape bark
- Ground cover fabric
- Biodegradable weed control fabric
Video Transcript
What Are No-Dig Beds?
No-dig beds are very similar to raised beds, the main difference compared to raised beds is that no-dig beds are generally at ground level, where as raised beds, as the name implies, are higher.
Raised beds have the benefit of being more comfortable to use due to their height, but they do require a good amount of soil or compost to fill them up. For my allotment, I went for no-dig beds, as I wanted a lot of them.
What no-dig beds and raised beds have in common is low maintenance. My growing cycle goes something like this:
Spring
Seedlings are sown directly into the bed. To save weeding, I use weed guard fabric.
Summer
Plants mature to harvest, requiring little more than watering, and perhaps covering with a net.
Autumn
The plot is cleared, and a mulch is applied directly on top. No digging is required. The bed has not been walked upon at any point during the growing season, so all that is required is the removal of any left over crops and weeding.
Winter
The bed is covered with ground cover fabric to stop any weeds growing, to ensure the bed will be ready to use as soon as spring arrives.
It has taken me a few years to come round to the benefit of creating no-dig beds. For years, probably around 10 years, I have kept my plot open, which has the benefit of flexibility, but has required re-digging year after year. And to be honest, as the years have gone by, I’ve found myself doing less and less digging, and using more plastic ground sheets, as a less tiring way of digging over a whole plot.
I have tried subdividing my plot into squares divided by paths. I found this helpful in making it easier to plan where to grow crops, but what I found frustrating, and time consuming, is the extra grass cutting involved.
Early spring often led to a plot looking overgrown, and throughout the year I found I was spending a lot of time cutting grass rather than growing.
Also, applying a nutritious mulch to a whole plot takes a lot of effort. This is inefficient, as the mulch is applied everywhere, but not all parts of the plot are in use in any given year, and paths are still required between planted crops.
Whilst my allotment has a communal area for well rotted muck, transporting and applying it to my allotment involves many wheelbarrow loads, and heavy lifting.
I wanted a solution that involved less digging, less grass cutting, more targeted application of mulch, and allowed my time to be spent growing stuff rather than keeping the plot from running wild.
For the last two years, having tried no-dig beds, I am not going back. The effort to create them is an investment in time and money that is more than repaid in much less work.
In summary, I think no-dig beds make allotmenting more enjoyable, and are especially good if you are looking for a way to make a plot easier to manage as you get older.
Wood For No-Dig Beds
For a no-dig bed you need wood. It you can source second hand scaffolding boards or similar, these would be great. For the quantity and lengths I wanted, I went to a specialist timber merchant.
To avoid delivery charges, I used a car roof rack. Be mindful of the weight of the wood to avoid a damaged car. I built my beds over a number weeks to avoid any problems. If using a roof rack, ensure the wood is securely strapped on.
For my no-dig beds, I used tannalised or treated timber to better withstand the weather on my allotment. I wanted quite bulky boards for the same reason, at 4.5 centimetres wide, 22 centimeters deep, and 3 meters long. Although bulky, I had no problem lifting the boards onto and off a car roof and around the allotment.
Preparation For No-Dig Beds
Although called no-dig beds, there is some digging involved to create them. The first step is levelling the ground where you would like to put them. If your ground is already nice and level you can skip this step.
As you go, remove any roots or perennial weeds. Look out for weeds like dandelion, and try to remove the whole plant to prevent weed growth.
My plot also suffers from couch grass. This sends out its roots horizontally under the ground. Again, try and remove as much of the roots as possible. The extra time spent clearing the bed thoroughly will save work in the years ahead.
As I was digging, a nearby robin was having a feast on the freshly dug ground. I was pleased the robin enjoyed the moment, as after the beds were made, it would be out of luck!
Making The Wood Frame
Once the ground was levelled, I positioned the wood around the plot where I wanted the no-dig beds to go. I tried to avoid walking over this area to avoid flattening the freshly dug soil.
I allowed at least 45 cm between the no-dig beds to allow enough space to easily walk around, lean over for weeding, and push a wheelbarrow if need be.
I decided on a width of 120 centimetres for each no-dig bed, and I cut down long lengths of timber to make these. Having used these beds for the last two years, 120 centimeters is the widest I would want. Any wider than this, and I would need to step on the bed to reach the plants, and I would not be able to reach to weed the beds with a hand tool.
I painted extra wood preservative on the freshly cut pieces to help prevent water penetrating into the wood.
The timber is held together with strong metal brackets. These are easy to buy from diy stores, I went for big brackets with plenty of screw holes.
I positioned these on the inside on the timber. Given the number of screws involved, using an electric screwdriver is well worth it.
Choose wood screws of a good length to penetrate deeply into the wood, but without going all the way through.
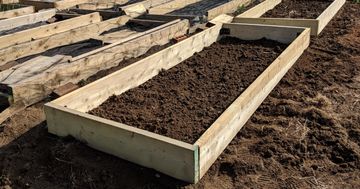
I assembled three sides of the frame, one long length on its side, and two width pieces at either end standing vertically. The advantage of doing it this way is that it is easy to achieve right angles. I then tipped it over to secure the final side. Doing this on flat ground is much easier.
Finally, I checked the final positions of the no-dig beds, making sure they were in line, and the path widths were correct.
If your ground is already flat, you can create the frame and leave the digging until everything is in place. This does save work, but as before, it is worth taking your time to remove any weed roots buried in the ground.
It is really satisfying once everything is in place. The freshly dug soil is now ready for planting, and hopefully will never need to be dug again!
However, freshly dug soil will have created the perfect conditions for weed seeds already in the soil, and for any fresh seed lucky enough to be blown in by the wind. To prevent weed growth, I cover my beds with fabric, so that they remain in good condition until I need to use them.
Before covering with fabric, you may want to apply a mulch as a feed. In time, earth worms should help incorporate this into the soil without you needing to do any digging.
Low Maintenance Paths
Low maintenance paths around no-dig beds save a lot of time. An alternative is grass paths, but this will give you a grass cutting job, and will likely lead to grass growing underneath your wood frame and growing inside your no-dig beds.
For my paths, I cut ground cover fabric to length and laid this between the beds. A few bricks are useful to keep the fabric in place whilst you lay it out, especially on windy days.
On top of the fabric, I spread out wood chips. Having tried a few types, I prefer the larger wood chips as they seem to stay in place better. The wood chips should be sufficient to hold the fabric in place, but in places exposed to the wind you may like to use some bricks or pegs for extra security to hold it down.
At the edges of the raised bed area, I created raised stops using a length of wood screwed to batons, and then pushed into the ground. This is to keep the wood chips from spilling out of the path.
Using Weed Control Fabric
One of the biggest advantages of no-dig beds is that they are ready to be used in spring time with very little work.
Spring is a very busy time for a gardener, and no-dig beds are a great time saver, especially if they have been protected with ground cover fabric. The soil is ready for planting.
I like to use weed control fabric to save even more work, and because weeding is one of the jobs I least enjoy doing. The fabric I like to use is biodegradeable, and provides protection for a few months of the growing season. Essentially, it gives my seedlings a head start over all the weeds, and by the time the fabric has degraded, the crop is mature and the weeds have missed their moment.
To plant the seedlings, I cut holes in the fabric, loosen the soil with my fingers or a hand tool, and position the seedling in place, remembering to firm the soil around the plant.
Depending on the seedling, I may separate the roots before planting. The whole process takes a little longer than planting without fabric, but is much much quicker compared to week after week of weeding.
If sowing seed directly in the soil, for example for growing carrots, parsnips, or peas, I cut channels out of the fabric. A few weeds grow in the channels, but these are soon cleared, and it is still much quicker than weeding a whole bed.
For larger seeds like broad beans, garlic, and shallots, I cut squares into the fabric at the right spacing and push the seeds into the soil. Because of the raised sides of a no-dig bed, it is very easy to protect the plants with a net, particularly useful for crops like cabbage, broccoli, and kale that are loved by birds.
My Results Using No-Dig Beds
I have found my crops grow much better in my no-dig beds. The combination of net protection, less disturbance from weeding, and extra moisture in the soil due to the use of weed control fabric, means the plants are healthier, bigger, and harvest quicker.
I hope this page helps you decide whether no-dig beds are right for you, and if you do make no-dig beds, that they give you many years of enjoyment.
Featured
The easy way for a gardener to organise their growing and discover gardening ideas.