How To Make A Concrete Shed Base

Introduction
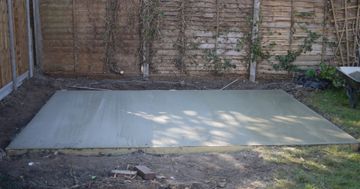
A concrete shed base is strong, level, and durable. It won’t move, and therefore the shed won’t either. It is made to measure for the shed, very slightly bigger in all dimensions, and very slightly raised above ground level.
A concrete shed base is probably the strongest and most durable option for a shed to stand on. However, there are other options, and these are discussed in my page about allotment sheds.
Play the video below, or carry on scrolling to read the step by step guide on how to make a concrete shed base. At the bottom of the page is a list of the materials I used to make the 12 ft by 8 ft concrete shed base shown in the video.
The easy way for a gardener to organise their growing and discover gardening ideas.
Step By Step Video
YouTube Video
Hello Two!
Hello Three!
Making A Concrete Shed Base
Making the shed base is hard physical work at all stages – it requires a lot of heavy lifting. This project involved about two tonnes each of moving soil, sub base, and concrete.
Start by digging out the area 15-20 centimetres below ground level, half of the depth used for the sub base, and half for the concrete layer on top. I used treated timber to define the shape and depth of the shed base. The base required the removal of a lot of earth and tree roots, filling most of a 6 yard skip.
Measuring the frame corner to corner ensures the shape is a true rectangle. Each diagonal should be the same length – if not, adjust until it is. Using a long spirit level ensures that each piece of timber is level. It's worth getting all this right, otherwise the shed base may not be the same shape as the shed itself, or will not be flat.
When all is correct, it is time to put down the sub base. MOT type 1 is granular material of different sizes, that binds together when compacted to create a strong well draining sub base. It is available in jumbo sized bags for home delivery from builders merchants and DIY centres.
The sub base material needs to be compacted. The best way of doing this is by using a plate compactor or wacker plate. On this project, as it was relatively small area, I used a builder’s rammer, to whack the stones until they no longer compress any further to create a flat surface.
The shed base required about 1 cubic metre of concrete. Using a cement mixer allowed the whole job to be completed in a day, much much faster than mixing by hand. Mixers are cheap to hire, but beware, they are heavy at about 50 kgs. Therefore, you may need help transporting and assembling one.
The concrete was made from two jumbo bags of ballast, a mixture of sand and stones, plus concrete. I prefer to buy concrete in waterproof bags to make storage easier to keep it dry.
Each load in the mixer used two buckets worth of ballast, half a bucket of cement, i.e. a four to one mix, and about half a bucket of water. Using plastic buckets as measures makes the job easier to control. Adding the water slowly helps ensure consistency, neither too sloppy or too dry, as shown in the video.
The trick to getting the concrete flat is a long piece of timber that reaches across the frame. This is used in a sawing motion to flatter the concrete until it is at the right level. I used a wheelbarrow to carry each batch of concrete to the shed base.
When pouring the concrete, use a spade to spread the concrete out using a gentle chopping motion to push the concrete down to eliminate air pockets.
Flattening the concrete using the wood timber can be hard work. When pouring, the concrete needs to be higher than the frame to avoid low spots when flattening, but too much concrete makes it difficult to move the timber across. Trial and error helps with this.
Ideally the whole concrete base is laid in one day to help the concrete bond together as one piece. On a hot sunny day, consider covering the concrete with a tarpaulin to slow down evaporation. Too fast evaporation can sometimes lead to cracks.
Ideally, the base will be laid at least two days before walking on or constructing a shed. On this project, the base was laid one weekend, and the shed constructed the next weekend.
Materials Used In The Video
These are the materials used to make the 12ft by 8ft shed base.
- Cement mix 4:1 (ballast:concrete) + water
- Hired of a cement mixer
- Hired of a 6 yard skip
- 2 jumbo bags of MOT Type 1
- 2 jumbo bags of ballast
- 12 bags of cement
- Treated timber: 145mm depth by 45mm width joists, these come in a variety of lengths eg: 2.4m, 3m, 4m
- Metal brackets & screws to make the frame